快速文档:https://letsencrypt.org/zh-cn/getting-started/
安装 Certbot ACME 客户端
选择
\28c5f894bcf4403aa430b5c112365079\clipboard.png)

按步骤操作:
安装 Install snapd
选择 centos : https://snapcraft.io/docs/installing-snap-on-centos
将 EPEL 添加到 CentOS 7 可以使用以下命令将 EPEL 存储库添加到 CentOS 7 系统:
# yum install epel-release
安装 snapd 将 EPEL 存储库添加到 CentOS 安装后,只需安装snapd包:
# yum install snapd
安装后,需要启用管理主 snap 通信套接字的systemd单元:
# systemctl enable --now snapd.socket
要启用经典snap 支持,请输入以下内容以在/var/lib/snapd/snap和之间创建符号链接/snap:
# ln -s /var/lib/snapd/snap /snap
确保您的snapd版本是最新的
在计算机上的命令行上执行以下说明,以确保拥有最新版本的snapd。
# snap install core
# snap refresh core
如果发生错误,请参考:https://www.phpriji.cn/blog/detail/snap-install-error.html
删除Certbot -auto和任何Certbot操作系统包
如果你使用操作系统包管理器(如apt、dnf或yum)安装了任何Certbot包,你应该在安装Certbot快照之前删除它们,以确保当你运行Certbot命令时使用的是snap,而不是从操作系统包管理器中安装。 具体的命令取决于你的操作系统,但常见的例子是sudo apt-get remove certbot, sudo dnf remove certbot,或sudo yum remove certbot。 如果您以前通过Certbot -auto脚本使用了Certbot,那么您还应该按照这里的说明删除它的安装。
实测:如果不删除,执行自动更新脚本(certbot renew --dry-run)也不会成功,但也不影响当前证书续期
安装Certbot
在安装Certbot的机器上的命令行上运行此命令。
# snap install --classic certbot
准备Certbot命令
在机器上的命令行上执行以下指令,以确保可以运行certbot命令。
# ln -s /snap/bin/certbot /usr/bin/certbot
选择您想要运行Certbot的方式
【注意】执行此步骤(certbot --nginx)前必须先在 nginx.conf(或者被引入 vhost/xx.conf) 配置好站点。
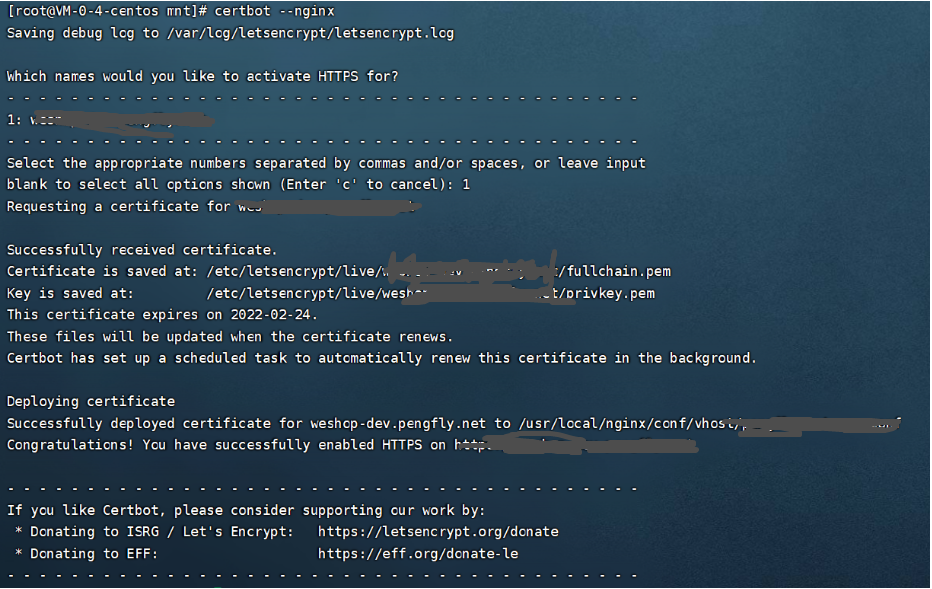
获取并安装证书…
运行这个命令来获取证书,并让 Certbot 自动编辑你的 nginx 配置文件(会把证书配置好,还会配好 http 跳 https),只需一步就可以打开HTTPS访问。
# certbot --nginx
......
Select the appropriate numbers separated by commas and/or spaces, or leave input
blank to select all options shown (Enter 'c' to cancel): 2 4 6 (支持输入多个,用空格或者英文逗号隔开)
【执行成功】
![]()
或者,只要生成一个证书
如果你觉得比较保守,想获得证书后,手工修改nginx配置,运行这个命令。
# certbot certonly --nginx
......
Select the appropriate numbers separated by commas and/or spaces, or leave input
blank to select all options shown (Enter 'c' to cancel): 2 4 6 (支持输入多个,用空格或者英文逗号隔开)
【执行成功】

【报错处理】
报错1:执行 certbot --nginx 报错,因为 nginx.conf 路径不对
创建软链接,方便 certbot 命令读取 nginx 配置 #ln -s /usr/local/nginx/conf/nginx.conf /etc/nginx/nginx.conf #修改 /usr/local/nginx/conf/nginx.conf 里面的 include 的路径配置,改成绝对路径,前面加下 /usr/local/nginx/conf/
报错2(2021-12-18):执行 certbot --nginx 后选择了要生存证书的域名,报错:
An unexpected error occurred:
UnicodeDecodeError: 'ascii' codec can't decode byte 0xe5 in position 1: ordinal not in range(128)
是因为 conf 里面有中文注释,导致无法解析。去掉中文注释就可以了。
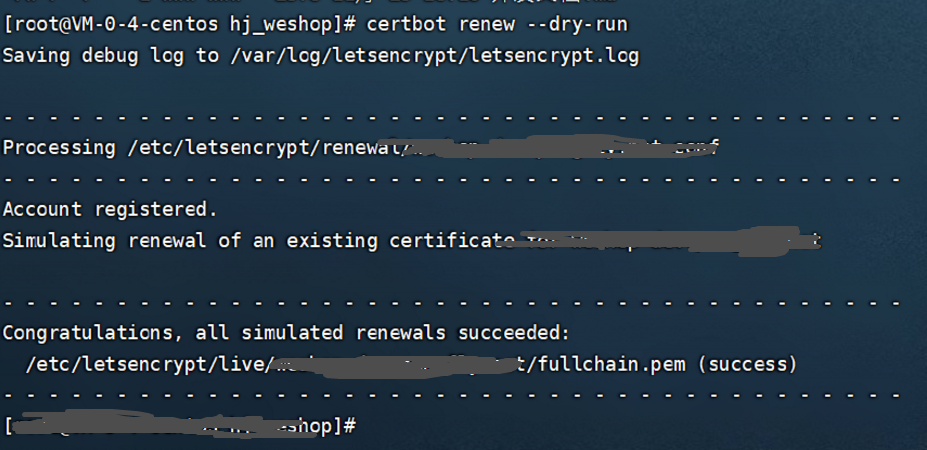
测试自动更新
系统上的Certbot包附带一个cron作业或systemd计时器,可以在证书过期前自动更新它们。 您将不需要再次运行Certbot,除非您更改了配置。 您可以通过运行以下命令测试证书的自动更新:
# certbot renew --dry-run
【测试成功】
\7f62a884682f4a658a3bd88f21cf50a7\clipboard.png)
可以在以下地方设置定时任务,完成定时更新证书
/etc/crontab/
/etc/cron.*/*
systemctl list-timers
我写在 /etc/crontab 下面
#vim /etc/crontab
....

#定时更新证书脚本
00 00 01 * * root certbot renew --dry-run
如何删除证书,如果直接删除 nginx.conf 的配置后,执行 "certbot renew --dry-run" 会报错,提示无法生成。
所以先要通过 certbot 删除证书;
certbot delete --cert-name